Airfix 1/72 Hurricane Mk.I Build Review
By Michael J. Gething
| Date of Review | November 2015 | Manufacturer | Airfix |
|---|---|---|---|
| Subject | Hurricane Mk.I | Scale | 1/72 |
| Kit Number | A02067 | Primary Media | Styrene |
| Pros | Simple build, unique mark | Cons | Identifying options |
| Skill Level | Basic + | MSRP (BP) | £7.99 |
Build Review
Acknowledgement: The build element of this Review is taken from a feature I wrote that appeared in the IPMS(UK) magazine #04/2015 and is reproduced here with the Editor’s permission. So now, on with the motley ...
This year saw the Brits taking pride in celebrating the 75th Anniversary of the Battle of Britain. In September, the skies over Southern England saw more Spitfire and Hurricane fighters in the air since those dangerous days of 1940. It was, of course, the Spitfire that captured the public imagination but what is not so well known, even in the UK, is that of the total number of Royal Air Force (RAF) fighter aircraft involved, the Spitfire only contributed one third, the other two thirds being the Hurricane and (as is oft forgotten in the mists of time) smaller numbers of the Boulton Paul Defiant, the twin-engined Bristol Blenheim Mk If (short-nose) and the Gloster Gladiator biplane (all of which feature in re-tooled Airfix kits over the past two years).
The prototype Hawker Hurricane, designed by Sir Sydney Camm, made its maiden flight on 6 November 1935, almost 80 years ago now. Powered by a Rolls-Royce P.V.12 engine (later re-named Merlin) driving a two-blade fixed-pitch wooden Watts airscrew (the delightful original name for the propeller), the prototype Hurricane had a maximum speed of 320 mph and a rate-of-climb of 2,420 ft/min. The powerplant for the production Hurricane Mk I was the 1,030 hp Merlin II or III, while the Mk IIC had a 1,280 hp Merlin XX, which offered a maximum speed of 339 mph at 22,000 ft and a service ceiling of 35,000 ft. The two-blade airscrew was replaced (late 1939-40) by a de Havilland two-position three-blader and, finally, by a constant-speed three-blader from either de Havilland or Rotol.
Ordered into production in June 1936, it became the RAF’s first single-seat monoplane fighter and was armed with eight 0.303 inch Browning machine guns. The fuselage and tail was of tubular metal construction and fabric covered, which helped get the aircraft into quantity production quicker. Initial production models had a flat fuselage underside but this was soon deepened, along with the rudder to assist recovery from a spin. The wings of early production aircraft were also fabric covered but were later replaced by a stressed-skin metal wing.
As the Hurricane evolved, later models featured a four-gun armament of 20mm Oerlikon cannon (Mk IIC) or a pair of 40 mm Vickers ‘S’ guns (Mk IID), plus provision for a pair of 250 lb or 500 lb bombs under the wings, or, as an alternative (later in the war), eight 3 inch rocket projectiles with a 60 lb high-explosive or semi-armour piercing warhead (Mk IIE and Mk IV).
Around 14,853 Hurricanes were built (depending on your sources) including some Sea Hurricane conversions and Canadian production, and it served in many theatres of operations (Europe, Malta, Western Desert, India and Burma), as well as with several other air forces during and after the Second World War. However, it is the two kits of the Hurricane Mk I in its early production form (with fabric-covered wings) that Airfix have added to their range that is the subject of this review, in three subtle flavours.
Kit A01010: First Look
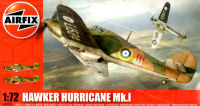
As the number would indicate, this kit was the first of the two to be released and offers what might be termed the ‘standard’ configuration for the Battle of Britain: the refined Mk I with a de Havilland two-position three-bladed propeller and rear fuselage fairing with deeper rudder. It comprises four main sprues moulded in light gray plastic (A to D). The parts are have fine surface detail with engraved panel lines and an accurate cockpit – there is no ‘floor’ as such. The transparency sprue (F) offers two windscreens and as the well illustrated and straightforward instruction sheet notes, part F2 (with the armoured glass) is the one to use. (Part F1 is for use with the two-blader version in kit A02067, of which more anon.)
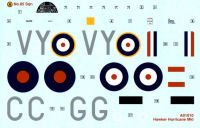
The decal sheet provides markings for VY-G of 85 Sqn, assigned to the RAF’s Advanced Air Striking Force based at Lille-Seclin airfield in May 1940, and includes various warning stencils as well as insignia. (The yellow ‘square’ for the upper wing is a special paint that changed colour in the presence of ‘poison gas’ in a similar way to litmus paper.) Curiously, there is no serial number included in the decal sheet or box artwork, leading me to conclude that either Airfix has ‘dropped a clanger’ [doubtful] or the references used to draw up the markings showed no serial number had been applied. (No doubt a Hurricane uber-geek out there can provide an explanation.) The colour scheme (featured on the rear of the box) is dark green/dark earth upper surfaces and the split black (port) and white (starboard) undersurfaces.
Although I have not built this particular model, readers should note that all comments on the basic construction (apart from the stage numbers) will apply equally to both kits A01010 and A02067. As you can only build the one version, there are no choice-of-parts to make (apart from the windscreen) and so the build is straightforward. A neat little model should result.
Kit A02067: Build Review
Afficionados of Airfix kits released over the last five years will have noticed the trend for the company to design their models so as to offer a second kit depicting a different model of the same basic aircraft, sharing many common sprues. Perhaps the Fairey Swordfish re-tool offering, initially, the wheeled undercarriage version and then, later, the floatplane version is the classic example. The same concept has been applied to the Hurricane Mk I: kit A01010 (given a First Look above) with the three-blade propeller; and A02067 which offers two variants of the two-blade propeller model.
So how do they differ? Kit A02067 comprises five main sprues (A to E) plus a transparency sprue (F). Sprues A-D and F are common to A01010, but it is the additional Sprue E that allows you to model the earlier versions. It contains the two-blade airscrew, early exhausts, flat fuselage underside, shallow rudder, original radio aerial and unarmoured rear bulkhead. The reason that Sprue D is included is that the Belgian version, although it uses the two-bladed propeller, original exhausts and radio aerial of the RAF version, has the deeper under-fuselage fairing and rudder parts of the later standard. (The rest of Sprue D – the three-bladed propeller and the other elements for the ‘standard’ configuration – can be consigned to your ‘spares box’). So, it is perfectly possible to built the aircraft as the ‘three-blader’ version as per kit A01010, although no markings are provided for this version.
The excellent decal sheet for A02067 provides markings for either L1584 of 111 Sqn., RAF (which took part in the Fete de l’Air Bastille Day celebrations at Villacoublay, France on 9 July 1938) or a Belgian Air Force example from Squadron 2/1/2AE (Chardon), based at Schaffen air base in May 1940.
So, with both versions to hand and their differences explained, I’ll attempt to guide the modeller who may be less familiar with the early model of the Hurricane genre through the maze of plastic parts required to complete kit A02067 as the original version of the famous fighter when first issued to the RAF in December 1937.
My first impressions were very positive. The mouldings are up to the very high standards that have marked the renaissance of the Airfix marque, and as I inspected the sprues and read the instructions, it became obvious that the company had done its homework pretty well. However, as good as the instruction sheet is (including the colour four-views showing camouflage and markings) it is, at times, ambiguous. So, when choices of parts need to be made, the instructions do not actually specify which part relates to which version. To be clear, option A relates to the RAF version and option B is for the Belgian aircraft. With the last page of the eight-page instructions being left blank, one cannot claim lack of space as an excuse for lack of clarity – Airfix please note.
So, with the benefit of experience, here is how I built this kit as the RAF version. While following the instruction sequence, the modeller should take note of my observations and comments that follow.
Stages 1 to 3 are SOP – standard operating (or in our case, building) procedure. At Stage 4, when bringing the two wing halves (A1 and A2) together, the lower wing halves are slightly wider than the upper halves. Don`t reach for your file or sanding stick to trim them to the same size as this is intentional and correct – it is a sloping joint but may need some careful sanding.
The first choice of alternative parts comes at Stage 6 of the instructions, only one of which is made clear in an inset to Stage 6, marked ‘A’ – the need to drill out a locating hole in the port fuselage side (B1) to take the pitot sensor for the RAF version (E10 – affixed at Stage 20). It is not apparent on the Belgian version. However, it appears to be too low down the fuselage side. (Looking at photos, I’d guesstimate raising that hole by about 2 mm, should you be a total pedant.) Don’t forget to apply the instrument panel decal to part A2 at this stage.
The first clearly marked option is at Stage 9 – choice 9a is for the RAF version, with the original lower rear fuselage part and tailwheel, although I left adding the tailwheel until after painting and decalling. (Choice 9b for the Belgian version with the deeper lower fuselage fairing and shorter tailwheel from Sprue D). Stage 10 continues the clear choice – 10a (RAF) having the shorter lower rudder and 10b (Belgian) the longer one to fit the fairing.
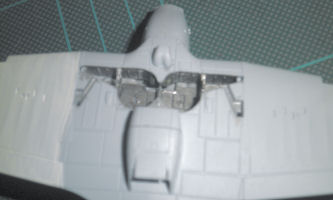
Stage 12 instructs us to locate part C1 (an element of the undercarriage hydraulics). However to locate it at this stage, I found I had to remove what I can only describe as “a bent pipe” in order to make it fit. With hindsight, I’d suggest this is fitted to the excellently-detailed undercarriage bay just prior to cementing the upper and lower wings together at stage 4. Even then, that bent pipe may need some trimming.
Stage 14 presents the choice of undercarriage position and if ‘wheels-down’ is preferred, then care should be taken when ‘threading’ the long horizontal supports on parts A9 and A10 under the undercarriage bay cross-struts. Similarly, at Stage 15, take care when fitting the rear supporting struts (parts B7 and B8) to the main vertical undercarriage member.
Stage 17 sees the wheels attached and here is where another subtle mistake has occurred – the early RAF Mk I aircraft had ‘five-spoked’ wheels, whereas the kit gives the more common ‘four-spoked’ version. Fear not, Carruthers, for Freightdog Models offers a pair of the five-spoked wheels (ref: FDR72066) for a modest price (plus P&P, naturally) ... which I have procured and used.
However, as with many modellers these days, I now leave the attachment of the undercarriage (including the tailwheel from Stage 9a) until after painting and the application of the decals, and in this case, prior to Stage 20 – the attachment of all the ‘fiddly bits’, liable to be broken while painting. This covers the engine exhausts, underwing pitot tube, radio aerial, the two-bladed propeller assembly (assembled in Stage 19), the wing landing light transparencies, pilot figure (if used) and the cockpit canopy. Use part F1 – the unarmoured windscreen for the RAF (and Belgian) versions. (Part F2 with the armoured glass windscreen is for use with kit A01010.)
So to a few notes about painting the model. Being an Ancient Modeller I’ve never been fully enamoured of the airbrush – I own an early Humbrol example but that is essentially a small spray gun, not the sophisticated instrument that the current modeller can acquire. I have used spray cans where an overall single colour is used or the model is large. Thus, I have a large collection of brushes ...
However, by way of demonstrating I’m far from being a Luddite, I have been experimenting in the use of acrylic paints for the past few years, although not exclusively. For the cockpit, the green interior and aluminium strut work for the seat was enamel, the details being touched up with black and red. I then gave the interior a black wash (Badab Black from the Citadel range, half a pot being donated by The Young Master when he suggested using washes for that ‘used’ look). The kit-supplied instrument panel decal was applied last.
For the wheel well, again I used enamel – Humbrol ‘silver’ no.191 – with a Badab Black wash – very necessary for the reality is that the very nature of a wheel well means that it will soon become ‘mooky’.
For the main exterior of the Hurricane, I mainly used acrylics and found that the colours usually require an undercoat of gray (Halfords primer gray spray can) and at least two coats of the colour involved. I chose to apply the dark earth (from the Lifecolour range) and used three coats across the whole of the upper surface camouflage area. The dark green element of the camouflage applied over the dark earth only needed two coats.
For the undersides, I continued with the Lifecolour acrylics and can report that the white part, compared with an enamel equivalent, gave better coverage and depth but it did need three coats; the black only needed two coats. For the underside centre-section, I carefully masked off the white and black areas (using another new-to-me modelling aid, Tamiya Tape) and used Humbrol’s Maskol to cover the underside light transparency, using Humbrol ‘silver’ once more. It worked well. To finish off the wings, I painted the wingtip navigation light transparencies (which are moulded ‘solid’ and not supplied as ‘clear’ parts) Humbrol silver.
Once the exterior had been complete to my satisfaction, the whole model was given a coat of Johnson’s Klear prior to applying the decals. To assist this process, I use the Japanese Mr Mark Setter and Mr Mark Softener (Microsol equivalents being out-of-stock when I last went to replenish supplies at my now-defunct local model shop). They worked well. On a note of experience gained over the years, this process took place over several days (usually prior to retiring for the night), to ensure elements had set sufficiently and would not be inadvertently slipped out of position when holding the model. The most frustrating element was application of the small WT (Wireless Telegraphy for those youngsters unfamiliar with this WW2 acronym) stencils, getting them exactly in place. I actually messed two decals but decided that as they were not visible when applied over the black wing underside, I could get away with it.
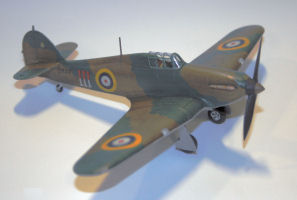
Second coat of Klear was then applied and, the next day, I sprayed the whole model with a matt varnish to bring a uniformity to the whole exterior surface. Once dry (again overnight), I played around with the wash once more to give the model a more ‘used’ appearance ... and then applied all the fiddly bits, as mentioned above. Odd bits of touch-up painting then followed and the model was complete to my satisfaction. It won’t win trophies at Scale Model World but it attains my satisfaction rating ... which is why we indulge in this hobby: building something with which we are happy.
To conclude, I’ll indulge in a bit of wishful thinking. Airfix now freely admits it is producing model kits for a niche market. So, having covered the fabric-winged Mk I, one immediately wonders how soon we might expect yet another variation depicting the metal-winged version, hopefully with a Rotol three-bladed propeller? (Dipping into various modelling blog-sites on the interweb, this is not beyond the bounds of possibility.) A re-tool of their original Mk IV with underwing rocket projectiles or a Mk IID with the underwing 40 mm cannon and tropical air filter would be welcome.


