Airfix 1/48 B-57G Canberra Build Review
By Fotios Rouch
| Date of Review | November 2019 | Manufacturer | Airfix |
|---|---|---|---|
| Subject | B-57 Canberra | Scale | 1/48 |
| Kit Number | A10104 | Primary Media | Styrene |
| Pros | Unique subject | Cons | Needs lots of help to get it right |
| Skill Level | Experienced | MSRP (BP) | OOP |
Build Review
For a look at this kit out of the box, look here.
The B-57G is probably my favorite Canberra variant. Not because it is pretty but because it is not! It was very purpose-built, and it had an interesting history and a bumpy development. There is a great account of its development at AFD-110323-015.pdf. There are a lot of details in this historical account and report (published in 1978). All the things that are happening today with acquisition with delays and overruns are described exactly in the same manner (just add bell-bottom jeans and tie-dyes)!
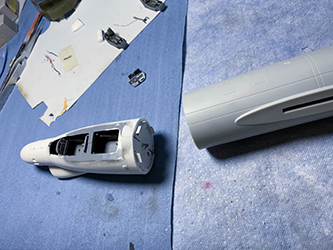
Airfix released a family of USAF Canberras under the Hornby umbrella providing parts for a B, an RB-57B, and a G. The kit is very soft on detail and not very accurate at all. I am focusing on the G which is OK for a toy but not for a modern design. I went ahead and used a bunch of aftermarket stuff. The most important addition is the DMold forward fuselage that makes the model look like a G. Airfix totally missed the mark. Instead of cutting the fuselage behind the cockpit and providing a proper G forward fuselage they kept the cockpit intact and gave us a ridiculous forward plug that looks like a hot dog. The problem with the DMold conversion is that it is elegant and has all the discrete panel lines in the right places and makes the rest of the model look like a toy. There are many areas in the kit that need to be thrown away, like the rudder, the Paveways, the control surfaces, the intakes and in the end, you wind up needing a new kit.
I started the build with the forward fuselage resin corrections set. I dipped the fuselage parts in boiling water for a few seconds so the resin memory could set them back in their original shape. Resin in baggies usually warps a bit in shipping and with storage. All the resin parts fit pretty good. Dark Gull Gray FS36231 was used and flat black for the cockpit. The DMold set includes all the relevant instrument panel detail that the Airfix kit missed but does not include the Douglas Escapac IC6 ejection seats so the generic Airfix kit seats had to be spruced up based on photos I found here. The forward fuselage was eventually adjusted and fitted to the plastic main fuselage with cyanoacrylate glue. The bomb bay was bowed in and the rotary cover would not fit. Spacers needed to be inserted to counteract the bow-in effect.
Work continued with the tail area. What a disaster. The rudder is a joke, in today's internet world this is the best they could come up with? I had two alternates. The Two Bobs ruder is OK but misses the tab and had too many mold defects. The DMold rudder was very good with all the correct panel lines, trim tab and lighter weight resin.
The horizontal stabilizers from the Airfix kit have no panel lines whatsoever. The Two Bobs stabs include the wing roots and go all the way to the fuselage and have the correct panel lines, but they had too many mold defects again and are heavy. I used them as a reference and scribed the Airfix stabs. Of course, I had to sand clean the wing/fuselage joints and continue the scribe lines from the wings all the way to the fuselage.
The intakes and exhausts were done next. I left the exhausts alone, but I had to add the cartridge starter ports. Too characteristic of a Canberra to miss.
My forward resin fuselage graft worked OK and some plastic panel lines were reworked to match the resin panel lines.
Next, I worked the "mystery" area: the sensor package on the front of the nose had a Westinghouse FLIR and night light amplification packages. I never found much detail in photos on the web, so very little was known to me. I had only one grainy black and white photo from the front of the plane that showed some of the sensors. I used that and created a sensor suite that will look okay behind the glass cover which I will tint a bit anyway.
The DMold clear resin canopy parts might not very clean but this is deceptive. They are fine. First, they need washing with detergent. Then some nice polishing. I use Tarnite metal polishing agent. It works great. Lastly, one more wash to get the polishing agent off and a nice deep in Future. The results are great.
The antennae plastic parts are not very good. Great for a 1960's model but we are not going there again. They need thinning down and careful look into photos for correct shape, size and location.
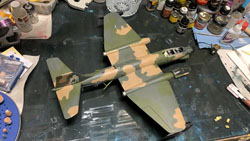
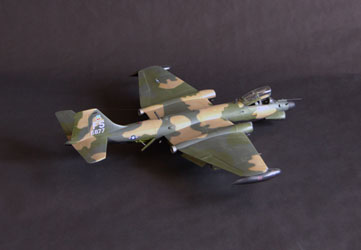
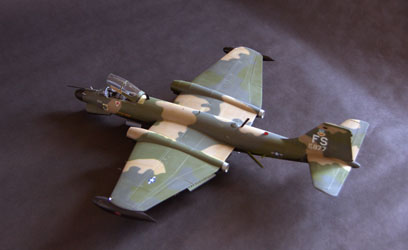
I used XtraColor paints for the camo and many photos. B-57Gs had variations in camo patterns. Use as many photos as you can find to get it half right.
Next, I built the wing tanks. I chose to add the ridge on the tank and a nav light.
Looking at pictures, I realized that I was missing two aux air intakes above the fuselage speed brakes. I had to scratchbuild them as the kit does not include them. I used spare parts that I cut to size and augmented them with styrene sheet stock.
I could not possibly use what the kit offers for wheels. I had a number of resin aftermarket sets from Reskit and one of from CMK. The Reskit wheels matched the photos and I went with it. The resin wheels needed drilling out which was no big deal. The front plastic landing gear was short shot and was missing the left axle. I decided to drill out the plastic and insert brass rod at the correct diameter to support the front resin wheels. Reskit has done a great job and includes all the details including even the brake cooling fins.
I applied the bottom black camo and painted next the interior green flaps and wells.
The navigation lights can benefit from a small drill hole and red or blur clear paint application to simulate the position light.
Another important thing missing from the kit is the large position beacon on the fuselage above the speed brakes. I scratch built some of it and also used red/clear resin from a Cutting Edge set.
I opted to add a bit of detail on the clear resin canopy and added some drilled styrene sheet, photoetch locks and photo etch fuselage canopy rails.
The kit Paveways are a joke so you need to dig into your Hasegawa weapons set for decent bombs.
The ZOTZS decals went on great and I hope to use them again for the silver B-57B I would like to do at some point. Weathering was done with AMMO and MIG paints.
Last few things are an antenna wire, the canopy and its support mechanism and some small touch ups.
The Canberra is finally done. Airfix could have done a much better job on it. Lots of details were missing or were wrong. In today's world blaming a Name means nothing. Management changes, funding changes, new collaborations with tool cutters get done, etc. This kit was just not one of their best. I added my own details, did my own research, probably made my own mistakes, but in the end, I have a legit B-57G. Recommended only with DMold's fixes and a lot of elbow grease.


