Agora Models 1/8 '67 Shelby GT500 Super Snake Kit Build Review
By Michael Benolkin
| Date of Review | February 2020 | Manufacturer | Agora Models |
|---|---|---|---|
| Subject | '67 Shelby GT500 Super Snake | Scale | 1/8 |
| Kit Number | GT500 | Primary Media | Die-cast metal, styrene, rubber, etc. |
| Pros | Beautiful details, prefinished parts, easy assembly | Cons | See text |
| Skill Level | Intermediate | MSRP (USD) | $129.99/month + $9.99 shipping per pack (see text) |
Build Review
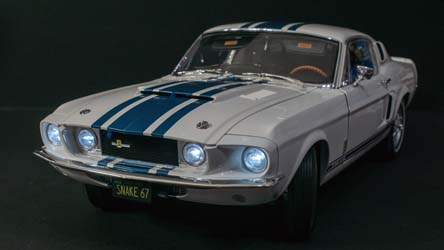
There's a new company in the higher-end kit market called Agora Models. Their first offering is a 1/8th scale 1967 Shelby 500GT and when finished, will look like the car in the above. Agora Models was kind enough to offer us a chance to put this kit through its paces, and like similar higher-end kits, will be delivered as monthly packs of parts that will be completed at the end of one year (though you can elect to do this kit in two years for a lower monthly cost). If you're not familiar with the subscription kit market, there are several companies out there that will send you packets of parts each month for a fixed cost that will result in a complete model at the end of the subscription period. You can read more about Agora Models' kit subscription options at their website here. One example of a subscription kit that comes to mind is the 1:1 replica of the Millennium Falcon studio model. These kits come pre-finished (in most cases) and offer lighting and other working features. In the case of this Shelby GT500, the kit is pre-painted white with the blue racing stripes, offers working doors, hood, and trunk lid, operating lights, engine and horn sounds, and steerable front wheels. At 1/8 scale, the assembled model will be roughly 23.4"x9.1"x6.9", so you won't need a room addition to display your new wheels. Assembly is accomplished with screws and the first kit includes a nice Philips head screwdriver.
- Jump to Pack 01
- Jump to Pack 02
- Jump to Pack 03
- Jump to Pack 04
- Jump to Pack 05
- Jump to Pack 06
- Jump to Pack 07
- Jump to Pack 08
- Jump to Pack 09
- Jump to Pack 10
- Jump to Pack 11
- Jump to Pack 12
- Jump to Completed Model
Pack 01
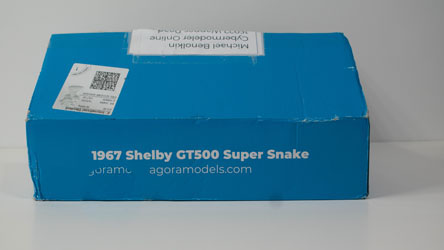
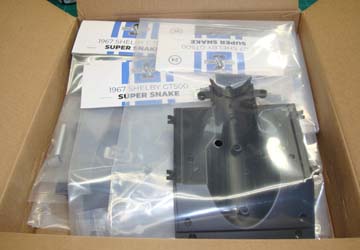
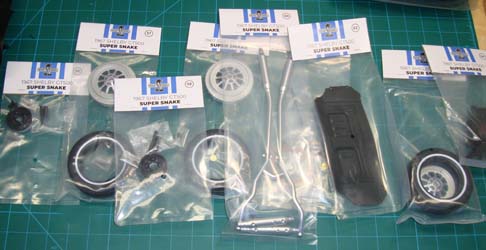
The first box arrived a day or so ago and looking inside brought back memories of the TV series MASH, where various characters were depicted mailing Jeep parts back to the U.S. so they could have their own Jeep at the end of the war. On opening the box, you can see a series of mini-kits that are well-packaged and waiting for your attention.
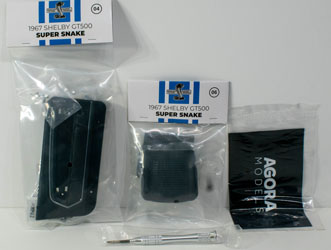
Here's a closer look at Pack One. This pack contains:
- Front Fascia Assembly
- Left Door Assembly
- Left Window Assembly
- Left Door Trim
- Driver's Seat Backrest
- Driver's Seat
- Agora Polishing Cloth
- Nice screwdriver
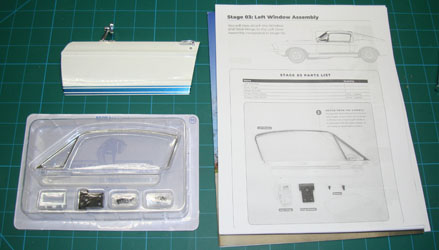
There is a nice color brochure included in this pack, but you won't see instructions. The instructions are downloaded from their website and each instruction set is made available there after each parts pack is released. The first set of instructions is 15 pages and well-illustrated, and while this might seem a bit lengthy for the parts involved, those with little or no experience with kits like this will appreciate the tutorial nature of these instructions so you're better equipped for the more complex packs to come. I simply printed the instructions so I can have them on the bench with me when we kick this project off.
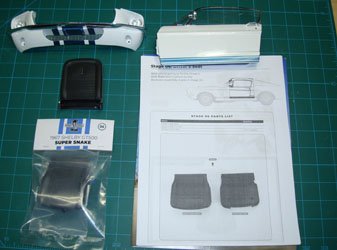
So we've got three subassemblies here: front fascia, left (driver's) door and driver's seat. We'll jump into these three subassemblies in Part One of our build review (coming very soon) and we'll add additional updates as new packs arrive onto the workbench. It will be interesting to see how long it will be before we have enough subassemblies to begin integrating these subassemblies into body, chassis, drivetrain, etc. What I see here is a thing of beauty! If you've wanted to try one of these subscription projects, I can't think of a better subject to try out.
Step One: Assembly of the front fascia. This is essentially installing the two headlight housings, lower grill, and front bumper to the fascia using small screws. Several things become apparent right away:
The powder coating/painting is flawless on the metal parts
The chromed plastic parts are good, but they were chromed before being cleaned up of any mold flash or sprue stubs
The different screws are packaged separately, and each set of screws includes an extra in case one flies off the bench or is otherwise consumed by the carpet. This is a first-class touch!
First up is the grill, which is photo-etched metal that attaches to the fascia with two screws. The force required to tighten down the screws is a little more than the screwdriver that was included in the kit is able to handle as I was getting metal shavings/chips on the tip of the screwdriver. It was here that I made a few minor changes. The tip of the screwdriver included in the kit is ideal for some of the smaller screws used, so I grabbed a slightly larger Phillips head to finish setting the screws in place. While these parts no-doubt fit together perfectly with the prototypes, the power coatings make things a little harder to work with but switching up to a larger screwdriver head compensates nicely.
Note that I have magnets attached to one screwdriver above. There are magnetic screwdrivers out there, but I can turn my screwdriver as well as the one included in the kit into a magnetic screwdriver this way. Why would you want to do this? You can put a screw in place at the tip of the screwdriver and it will stay there while you hold the screwdriver in one hand and the assembly in the other. Using this technique in the entire build, I never lost a single screw.
The left headlight housing goes into place with no problems, but the right one would not quite fit. I don't know if it was the powdercoat, but I simply grabbed a small hobby file and removed a little mold flash from the bezel until the housing fit properly. Just a little patience and test-fitting solved that problem.
Step Two: Left door - this step puts the rearview mirror and exterior door handle on the door. Once again I used the small screwdriver with magnets to place the screw and get the first bit of threading started, then switched to a larger screwdriver to finish the job.
Step Three and Four: Left door interior - the door glass is mounted to the inside of the door, followed by the door hinge, and finally the door panel that includes the interior door handle and window crank. It took me a while to interpret the instructions on how that interior door handle is installed as I've never sat in a GT500 or Mustang of that era to understand what the instructions were trying to tell me. After a bit of fiddling/dry-fitting parts, I understood and resumed assembly.
Steps Five and Six: These steps build up the rear and base of the driver's seat. No mysteries here.
So here are the three subassemblies and the set of tools I used to get here. In addition to the screwdriver included in this kit (plus magnets to hold onto the screws), I have two other Phillips screwdrivers of larger sizes to properly work the different sized screw heads in this kit. To clean up some mold stubs and flash, I used my Sujiborido plaining file, a regular file, and my X-Acto knife. The X-Acto knife was only used to remove the clear plastic housings holding the kit parts as well as opening the tiny bags of screws. As for the files, I started inspecting each plastic part and removing the stubs and flash before installing the parts. Only on the side of the rearview mirror was an exposed area where I had filed through the chrome, and this was touched up with a Molotow chrome pen.
These three subassembly projects are good choices for Agora to provide to the new builder as you get to know the parts and techniques without being able to hurt anything though be careful with the driver door as we've got chromed plastic parts on either side that can be broken if you're not careful.
Pack 02
Four months ago, we embarked upon the build of this beautiful Shelby GT500 Super Snake kit, and by now we should be working on Pack 05. Unfortunately, the Wuhan pandemic basically shut the globe down and things are still far from being 'normal' again. Nonetheless, Agora Models was finally able to ship the backlogged packs so we can catch up with the build. Here is Pack 02:
Here's a closer look at Pack Two. This pack contains:
- Right Door Assembly
- Right Window Assembly
- Right Door Trim
- Passenger's Seat Backrest
- Passenger's Seat Seat
- Rear Chasis
- Fuel Tank Bottom
- Fuel Tank Top
Step Seven: Right door - this step puts the exterior door handle on the door. Once again I used the small screwdriver with magnets to place the screw and get the first bit of threading started, then switched to a larger screwdriver to finish the job.
Steps Eight and Nine: Right door interior - the door glass is mounted to the inside of the door, followed by the door hinge, and finally the door panel that includes the interior door handle and window crank. Having one the left door in the previous pack, this time the step was easy. The process wraps up with the installation of the door trim.
Steps 10 and 11: These steps build up the rear and base of the passenger's seat. No mysteries here.
Step 12 through 14: These steps are the first time we have part of the chassis and we simply add the two halves of the fuel tank and fuel filler next using the included screws. Be careful as that fuel filler neck is plastic and could break of you flip this assembly over without support.
So here are the three subassemblies completed and next time we'll be adding more parts to that nice heavy casting of the rear chassis. For now, these three subassemblies are put away with the Pack 01 subassemblies for safe keeping. Total time with this pack was less than an hour.
Pack 03
While Pack 01 and 02 built up the two doors, two front seats, and the front-end fascia, it also provided the rear portion of the chassis and the gas tank. We carry on with Pack 03 and build up on that structure.
Here's a closer look at Pack Three. This pack assembles:
- Rear Main Chassis
- Rear Floor Pan
- Rear Axle and Differential Housing Cover
- Rear Axle and Coil Springs
- Rear Left Wheel Housing Liner
- Rear Left Leaf Spring
- Rear Right Wheel Housing Liner
- Rear Right Leaf Spring
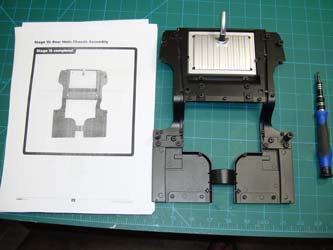
Step 15: Rear Main Chassis - where the assembly in step 14 is the section under the trunk, this step adds another section that adds the rear half of the interior to the assembly. The two sections go together with a very strong joint held together with screws, but take care here as now you're screwing into powder-coated metal that may need some extra tools. The Phillips screwdriver that was included in this kit was slightly stripped when tightening screws into the power-coated doors and now it can't handle some of the screws used in this kit. I've also chewed up a few Phillips heads out of my modular screwdriver set, but if you run into some difficulties with a Phillips screwdriver, use a flat head screwdriver with a tip that fits into the slots of the screw in question. That works every time for me.
Step 16: Rear Floor Pan - the floor pan includes the hump that covers the drive train and while it is plastic, it is screwed into place on the metal chassis, so the above screwdriver tips apply here as well.
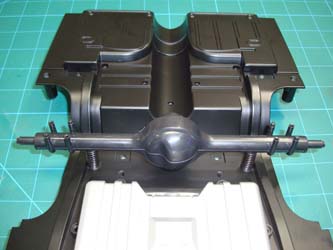
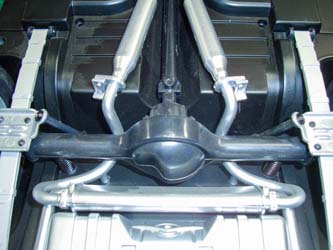
Steps 17 and 18: Rear Axle, Differential Housing Cover and Coil Springs - these steps go quickly as the parts are all plastic, but ensure you have the differential housing cover oriented according to the instructions. This is wrapped up mounting the rear axle assembly to the chassis and when your finished, the coil springs to allow you to articulate the rear end.
Step 19: Rear Left Wheel Housing Liner - This plastic part drops onto three mounting holes on the chassis and provides the wheel well interior.
Step 20: Rear Left Leaf Spring - While you don't have to build up the individual leaf springs, they are pinned to the mounts, and in turn, mount to the chassis very much like the full-scale car. Pay attention to the orientation of the spring as shown in the instructions as they won't align to the rear axle if you get these backwards. Once they're mounted, the leaf spring connects up to the rear axle's two pins and is held together with two screws.
Step 21: Rear Right Wheel Housing Liner - Same as step 19
Step 22: Rear Right Leaf Spring - Same as step 20, and you can see that this project is starting to look like a Mustang (Shelby GT500).
Pack 04
With this pack, we get a full-length chassis complete with interior floor pans and the start of the front-end details.
Here's a closer look at Pack Four. This pack assembles:
- Middle Chassis
- Front Floor Pan
- Driveshaft
- Gearbox and Crossmember
- Front Chassis
- Front Fender Splash Guards
- Tie Rod Assembly
- Steering Assembly
Step 23: Middle Chassis - we pick up from Pack 03 by adding the middle chassis to the assembly built-up in the last installment and now the chassis extends up to the firewall area. This is one cast frame part that fits snugly to the assembly and mounts with four screws. As I mentioned last time, screws going into these cast metal parts that are then powder-coated can be challenging. Now I use a magnetic phillips screwdriver to get the screw started, then revert to a flathead tip screwdriver to thread the screw into place until it is tight.
Step 24: Front Floor Pan - this floor pan is plastic like the rear floor plan and screws into the cast metal middle chassis. Here is the first and only problem I encountered as the screw provided for the center pilot hole overlapping the front and rear floor pans didn't really fit well and stripped without any effort. I simply removed the screw, added a strip of plastic into the hole, then re-seated the screw until it was snug.
Step 25: Driveshaft - the drive shaft halves go together with three small screws, then one end slots into the differential before the mounting tabs fit into their mounting holes under the chassis and are held in place with two screws.
Step 26: Gearbox and Crossmember - here's the transmission that overlaps the drive shaft and then mounts to two holes in the chassis. Two screws later, and this kit has a drivetrain!
Step 27: Front Chassis - the front portion of the chassis mounts to the chassis assembly in the same way as the middle chassis and with no problems. This beast is now 31" long!
Step 28: Front Fender Splash Guards - each guard mounts to the chassis at the rear of the front wheel wells will be with two screws.
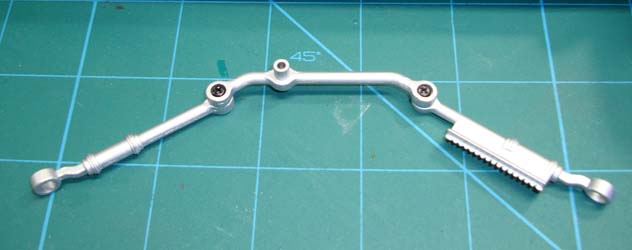
Step 29: Tie Rod Assembly - Each of these parts is powder-coated metal, and to keep things simple, I threaded each screw into place without any other parts, and with the threads cut, I removed the screws and assembled this tie rod assembly according to the instructions. Update: I had to come back to this assembly near the end of this build as the tie rod is not rigid. I removed this from the front end as the front wheels would not steer together. The screws holding the three parts together (below) were as tight as they'd go, but the tie rod assembly was still not rigid. I removed the screws and found that there was flash inside the holes of these white metal parts and after filing out those holes carefully with a round file, I was finally able to get the tie rod assembly tight and rigid. Back on the car and the front wheels are steerable by moving one of the wheels. The gearplate on one end of the tie rod still does not mesh with the end of the steering column, so you cannot use the steering wheel to 'steer'.
Step 30: Steering Assembly - This step is actually three smaller steps. The tie rod assembly receives another part, so again I pre-threaded a screw before assembly. The chassis receives two front end suspension arm mounts and the steering gearbox (silver) under the front end. Between the fuel filler neck on one side and the steering gearbox arm on the other, care will be needed to keep from damaging the chassis assembly during handling or setting down on the bench.
Pack 05
With this pack, we get a full-length chassis complete with interior floor pans and the start of the front-end details.
Here's a closer look at Pack Five. This pack assembles:
- Stabilizer Bar and Lower Suspension Arms
- Upper Suspension Arms
- Front Interior Floor and Gear Lever
- Front Side Walls, Pedals and Switches
- Dashboard and Fuse Cover
- Dashboard Trim, Dials and Shelby Badge
- Central Dials, Car Radio and Glove Compartment
- Rear Floor and Front Seat Belts
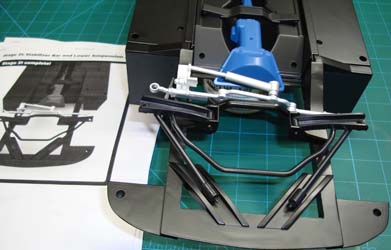
Step 31: Stabilizer Bar and Lower Suspension Arms - the lower suspension arms drop into the mounting pockets we installed back in step 30 and are pinned into place. Note that from this point on, you need to examine the plastic parts a little closer as there is a little mold flash that will interfere with the free movement of some assemblies. I simply use an X-Acto knife and a small file to clean any flash as needed. While we're here, we can test-fit the steering assembly with the steering box which were both finished in step 30. All looks great and I put the steering assembly away for the time being.
Step 32: Upper Suspension Arms - the upper suspension arms are pinned together to their chassis mounts, but not before mold flash was cleared to ensure free movement. With the upper arm assemblies together, they mount onto the chassis above the lower arms (naturally).
Step 33: Front Interior Floor and Gear Lever - the front floorboard is injection-molded plastic that has a simulated carpet sprayed onto the surface. We'll need to ensure that some of this spray-on stuff doesn't interfere with assembly. In this step, we simply mount the stick shift above the transmission hump with a single screw.
Step 34: Front Side Walls, Pedals and Switches - here's where we start to see some of the upcoming features of this model. First, we mount the sidewalls to the front floor, and you'll need to scrape some of the spray-on carpet to get the sidewalls to mount into place. There are two holes in the firewall where the pedals will mount and here, we mount two microswitches into a small frame which, in turn, is mounted to back side of the firewall. The accelerator and brake pedals have posts molded to the rear side which protrude through the firewall and when you press on one of the pedals, you can feel the microswitch click. Be sure you have the switches in the correct spots on the mount and they're facing the holes when mounting these to the firewall. The instructions walk you through this step. We finally mount the pedals and the switches are set up correctly.
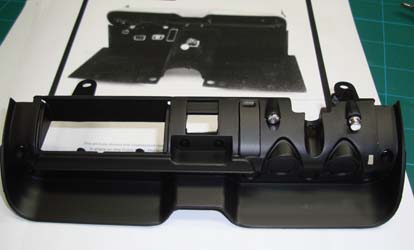
Step 35: Dashboard and Fuse Cover - the dashboard is next up and in this step, we simply install the fuse panel cover with a single screw.
Step 36: Dashboard Trim, Dials and Shelby Badge - this is one of the busiest steps so far. First, we apply the sticker-based instrument gauge faces to the dashboard. I use tweezers to place each face and make whatever adjustments needed before pressing the face into place which activates the adhesive. I made sure my fingerprints are gone by rubbing the dash with a clean microfiber cloth. The clear part that provides the glass covers for the instruments is mounted to the chrome dash overlay and this is again cleaned with the microfiber towel. The silver trim overlay goes over the chrome and then this assembly is screw-mounted to the dashboard. Last up is the Shelby logo which is fixed to another chrome part before being mounted to the dash with two screws.
Step 37: Central Dials, Car Radio and Glove Compartment - assembly continues with the radio head which comes pre-finished and only needs to be screwed into place. The center instrument cluster that mounts below the radio just like the dashboard before mounting through the bottom of the dashboard.
Step 38: Rear Floor and Front Seat Belts - here is a good example of the carpet material getting in the way. You can see in this first photo how it leaked from the other side and cured into place over a mounting tab and surface. This is where the rear floorboard attaches with four screws, but first I scraped away this overspray with my knife, then mounted the front and rear floorboards together. The front seat belts are next, and these come pre-assembled ready to mount. The left and right seat belt anchors fit through slots in the floor and are held in place with friction (they aren't going anywhere). The belts also go through slots next to the transmission hump and the end of each belt goes over a stub molded on each side under the floor. As suggested in the instructions, I used tape to hold these mounts in place.
Pack 06
With this pack, we get a full-length interior floor, most of the rear side panels. and additional interior detailing.
Here's a closer look at Pack Six. This pack assembles:
- Interior Details
- Rear Seat Support
- Interior Rear Platform
- Left Rear Interior Panel
- Left Rear Upper Interior Panel and Ventilation Grille
- Interior Trunk Partition Panel
- Rear Seat Folding Panel and Hinge
- Rear Seat Backrest Panel
Step 39: Interior Details - here we install the front and rear rubber floor mats and fire extinguisher. The mats simply press into place while the extinguisher requires minor assembly before also being pressed into place.
Step 40: Rear Seat Support - this is a single part that attaches to the rear of the interior assembly and will mount the rear seat in a later step. This simply attaches with several screws.
Step 41: Interior Rear Platform - this is another single part that attaches to the rear of the Rear Seat Support to provide the storage area behind the rear seat.
Step 42: Left Rear Interior Panel - if you find the two rear trays somewhat flimsy, here is where we install the first rear side panel that provides the structural strength. First two trim parts are added to the panel before it is attached with screws to each of the three levels.
Step 43: Left Rear Upper Interior Panel and Ventilation Grille - for some reason, this is molded separately from the Left Rear Interior Panel and adds the air vent that provides air from the scoop mounted on the outside of that position. This part screws to the lower interior panel, and when we do the right side, I'm going to assemble the upper and lower interior panels before mounting them to the interior assembly.
Step 44: Interior Trunk Partition Panel - This is another single part that attaches to the rear of the Interior Rear Platform and then stubs on either side snap into receiver holes on the left and right interior panels. The plastic is somewhat flexible so it is easy to get this into place, but trying to snap the stubs into their receivers was causing a bit too much flexing of the plastic assemblies for my comfort. I used a small pliers to snap each point into place.
Steps 45 and 46: Rear Seat Folding Panel and Hinge/Rear Seat Backrest Panel - this combined assembly folds down over the rear seat to provide stowage space behind the front seats, or folds back to provide the upper portion of the rear seat. This step introduces one of the more delicate assemblies so far, three tiny screws and a hinge. If that hinge gets bent, you many not have the ability to move this assembly. I used my magnetically charged screwdriver to place and drive each of those tiny screws, so the old saying of having the right tool for the job does apply well here.
Pack 07
Here's a closer look at Pack Seven. This pack assembles:
- Right Rear Interior Panel
- Right Rear Upper Interior Panel and Ventilation Grille
- Lower Dashboard Panel, Roll Bar, and Seat Belts
- Rear Seat and Seat Belts
- Rear Platform and Seat-Back Locks
- Left Front Wheel
- Right Front Tire and Rim
- Muffler and Exhaust Pipes
- Right Front Wheel Parts
Steps 47 and 48: Right Rear Panels - as I mentioned during the assembly of the left rear panels from Pack 6, it would be easier to assemble the upper and lower panels before mounting them to the interior subassembly. I did that on the right side and there was far less flexing of the interior. Here is my use of the small pliers to snap the tabs on the rear together.
Step 49: Lower Dashboard Panel, Roll Bar, and Seat Belts - if ever you needed a magnetic screwdriver, the lower dashboard panel would otherwise best be installed by removing the dashboard assembly first. That wasn't necessary here as I do have magnetic screwdrivers to get the various screws placed and started. The roll bar goes on without a fuss, but then the shoulder harnesses will require a bit of attention. When I read the steps to assemble the harness reels that mount to the roll bar, of course I put them on backwards. When you're finished and you find the textured surface of the belt facing to the rear, you've got it wrong. Fortunately, this is easily remedied.
Step 50: Rear Seat and Seat Belts - this is another single part that attaches to the rear of the Rear Seat Support to provide the storage area behind the rear seat.
Step 51: Rear Platform and Seat-Back Locks - if you find the two rear trays somewhat flimsy, here is where we install the first rear side panel that provides the structural strength. First two trim parts are added to the panel before it is attached with screws to each of the three levels.
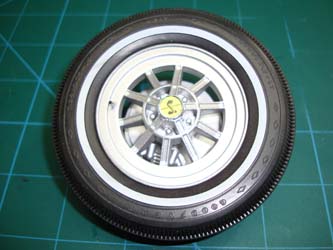
Steps 52 and 53: Left and Right Front Wheels and Left Wheel parts - these are easily the most challenging steps in this build so far. The tires are stiff vinyl/rubber and you're supposed to insert the rim into the tire. The problem is that the rim is actually a heavy casting that not only has the rim but also a metal ring that goes inside the tires to keep them from sagging/going flat. If you've seen the inside of a run-flat tire, that's what you have here except the secondary 'tire' here is metal. According to the instructions, you're supposed to insert the rim/ring through the tire at a 90 degree angle and work in into the tire as you turn it. That wasn't happening for me, so I used the tip in the instructions and went for near-boiling water to soften the tire, but that didn't work for me either. The solution for me was a heat gun which I carefully used to heat the tire, pushed the rim/ring through at a 90 degree angle, then pushed the rim/tire together flat on my metal workbench. When I saw what was involved, there was no way I was going back and do this all over again with the right wheel, so I had it with me and assembled both wheels. If you go this route, be very careful as you can melt the tire if you get it too hot and even so, I melted the microfiber towel I was using to hold the hot parts. Back at the bench, I installed the disk brakes and axle for the left wheel.
Step 54: Muffler and Exhaust Pipes - The drawings weren't clear to me how the pipes went together with the muffler, so I peeked ahead to the instructions for Pack 8 (available on the Agora website) to see how they mount to the chassis. With that view, I assembled the pipes as you see and this is the first step where I actually used liquid cement on this project, to mount the exhaust cones to the ends of the pipes. Since I peeked ahead, I knew that the pipes weren't going to be in the way of later steps, so I mounted them on the chassis to keep them safe.
Step 55: Right Front Wheel Parts - this step added the brakes and axle to the right wheel just like step 52. After that, the instructions have you mount the front end with the wheel assemblies and tie rods together. This took just a few minutes of ensuring the various subassemblies were properly oriented and then assembling them together as you see here. This is starting to look like a car! Update: As I mentioned previously, I had to come back to this assembly near the end of this build as the tie rod is not rigid. I removed this from the front end as the front wheels would not steer together. The screws holding the three parts together (below) were as tight as they'd go, but the tie rod assembly was still not rigid. I removed the screws and found that there was flash inside the holes of these white metal parts and after filing out those holes carefully with a round file, I was finally able to get the tie rod assembly tight and rigid. Back on the car and the front wheels are steerable by moving one of the wheels. The gearplate on one end of the tie rod still does not mesh with the end of the steering column, so you cannot use the steering wheel to 'steer'.
Pack 08
With this pack, we get a full-length interior floor, most of the rear side panels. and additional interior detailing.
Here's a closer look at Pack Eight. This pack assembles:
- Shock Absorber and Left Rear Brake
- Left Rear Wheel
- Shock Absorber and Right Rear Brake
- Right Rear Wheel
- Exhaust System Assembly
- Steering Column and Steering Wheel
- Trunk Panel
- Spare Wheel, Steering Wheel and Floor Assembly
- Trunk Panels, Jack, and Fixing the Spare Wheel
Steps 56 and 68: Shock absorbers - so I'm not sure why these weren't part of the rear suspension assembly as you must remove the plates spring plates installed previously and add the shock absorbers. These were installed per the instructions.
Steps 57, 59, and 63: Rear wheels and spare - as I mentioned in Steps 52 and 53, installing the rims into the tires is one of the most challenging tasks in this build. The instructions suggest heating the tires in hot water, but that didn't work for me, so I used a heat gun. I performed steps 52 and 53 at the same time to get that job done in one session. If I followed the instructions, I'd be doing these wheels in three sessions, but I got them done in the same session. For the record, once a builder finds a technique that works, get all of the wheels built-up at one time, don't make them wait for a month (or more) to reinvent this process. In addition, it would be nice to have the builder assemble the spare first so the other wheels go together with less effort and less potential to damage the white sidewall.
Step 60: You will recall that I opted to install the muffler assembly in the last installment rather than have that assembly sitting loose. Shame on me for not reading ahead in these instructions as in this step, I'm instructed to remove 18 screws from the chassis and partially disassemble chassis. That's when I see the punch line that I'm supposed to install the mufflers now. Lesson learned, I reinstalled the screws and moved on. The exhaust pipes that run from the engine to the mufflers is installed with four screws.
Step 61: The steering column goes together though I did run into one new challenge - I laser-print the instruction booklet for each pack to use on my workbench. It was in this step that I realized that they were marking key points in red and the markings were not visible in B&W printing. A quick peek at the computer resolved this though it would be better if the instructions were usable in B&W if they're not being provided in hardcopy.
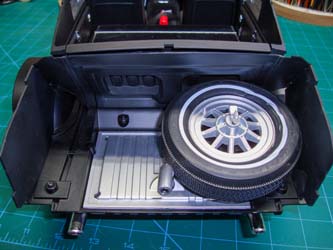
Steps 62 and 64: The trunk partitions go together easily as does the mounting of the spare tire in the trunk.
Pack 09
With this pack, we are building the engine and cooling system.
Here's a closer look at Pack Nine. This pack assembles:
- First Parts of the Radiator
- Radiator Shroud and Fan
- Front of the Radiator
- Engine Parts
- Front Housing and Pressure Pump
- Alternator, Pulleys and Radiator Hose
- Engine Block, Right Exhaust Manifold and Light Switch
- Left Engine Block, Exhaust Manifold, Gear Box, and Radiator Support
- Engine Block Bottom, Oil Cooler, and Connection Cable
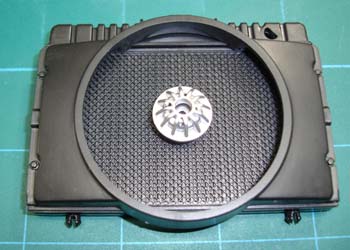
Step 65: First Parts of the Radiator - this pack starts off with assembly of the rear of the radiator which consists of a plastic plate, photo-etched grill, and die-cast fan clutch. This is a quick and easy way to get back into the build process after the month break.
Step 66: Radiator Shroud and Fan - this is another quick step adding the fan shroud to the assembly from Step 65 and the parts kit includes the fan, though it is not installed until later.
Step 67: Front of the Radiator - another quick step that builds the front half of the radiator, coolant reservoir atop the radiator (complete with radiator cap), and mounting the oil cooler. The front half mounts to the rear and you have the radiator assembly completed.
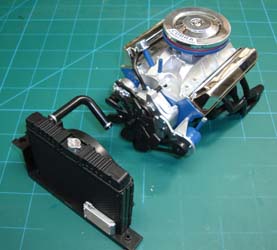
Step 68: Engine Parts - now we get to open that clear pack of die cast parts that begin the engine build process. This group includes the intake manifold/heads in silver, valve covers in chrome, and an air cleaner that sits atop the four-barrel carburetor that, in turn, mounts to the top of the intake manifold. All of this is fairly quick and easy though there is one step of note where patience and experience came in handy. That air cleaner consists of the blue bottom, chrome top, and that strip of photo-etched (PE) metal with the red stripe that goes in between. The instructions show that PE being inserted into one half and that the other half should go right into place. It didn't. Having worked with photo-etch many times before, the easiest thing to do is to carefully work the strip with my fingers bending it into a half-circle. You could almost form the complete circle by hand, but fitting the half-circle into the lower half was much easier to manage and then do the simple tweaks to get the top to drop into place.
Step 69: Front Housing and Pressure Pump - This is the front of the engine where the various pulleys will be mounted and the pressure pump is pressed into place.
Step 70: Alternator, Pulleys and Radiator Hose - here we add the pulleys, generator, etc., to the front housing and also add the upper radiator hose to the radiator assembly.
Step 71: Engine Block, Right Exhaust Manifold and Light Switch - in this step, we add a light switch to the dash board and install a backing bracket to hold it there. While this was easy enough to do, I'm wondering why this wasn't done while were still working on the dash board? The exhaust manifold is four separate parts that snap into the engine block on one end and pressed into the collector on the other. Each tube is marked 1R, 2R, 3R, or 4R, and they plug into the hole on the collector that is also marked. It took a little trial and error to figure out how to orient the parts, and I also discovered that the pins on the ends of the pipes that plug into the collector are very delicate as one snapped off without effort. Be careful and take your time.
Step 72: Left Engine Block, Exhaust Manifold, Gear Box, and Radiator Support - we repeat the exhaust manifold process for the left side of the engine, slide the engine front and gearbox cover to the front and rear of one engine half, carefully mate the other engine half onto the assembly, and then tighten down the engine block without damaging those delicate exhaust manifolds..
Step 73: Engine Block Bottom, Oil Cooler, and Connection Cable - in the final step in this pack, we add a bottom plate to the engine block and an oil cooler to the front of the radiator. The oil cooler mounts by press-fitting the two pins on the bottom of the cooler onto the base plate for the radiator assembly, but unfortunately my cooler had one pin that had been broken (the broken pin was inside the parts bag). I'm sure Agora has the ability to replace damaged or defective parts, but there's nothing I've experienced that won't be fine with a dab of cyano adhesive.
Pack 10
With this pack, we are finishing the engine and engine compartment.
Here's a closer look at Pack Ten. This pack assembles:
- Distributor, Spark Plug Wire and Oil Pan
- Side Panel and Front Right Shock Absorber
- Engine Central Panel, Pump and Brake Fluid Reservoir
- Front Left Panel, Speaker and Suspension
- Battery, Strut Bar, Oil Filter and Pipes
- Washer Fluid Reservoir, Electronic Circuit and Wiring
- Left Front Fender
- Chassis Front Panel
- Right Front Fender
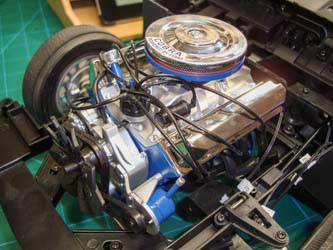
Step 74: Distributor, Spark Plug Wire and Oil Pan - This step adds the oil pan to the engine assembly and, in turn, the engine is mounted to the chassis. Next came the ignition wiring and this took some time to complete as there's a mismatch of materials here that can cause some interesting frustrations to emerge. Installing the ignition coil and distributor is no problem, but this step provides eight connectors that plug into the distributor and the other end plugs into tubing that is cut to length to represent the ignition wires. The instructions show the wiring sequence, but the tubing is only press-fit onto the connectors with the other end of the tubing going down a hole in the engine block representing where each spark plug is located. The tubing is rigid enough that any attempt to bend the tubing to go into the engine block and the other end would pop off the connector on the distributor. After several minutes of this chaos, I verified the length of each ignition wire and then pressed one end onto the appropriate connector on the distributor and kept it there with a drop of cyano. With the help of the cyano, all eight ignition lines went in without further drama, but then I discovered there should have been nine connectors - one more to connect the distributor to the ignition coil. I simply cyanoed one end to the coil and the other end in the center hole on the distributor cap. The PCV valve hose also needed a little cyano to stay in place.
Step 75: Right Side Panel and Front Right Shock Absorber - The right side of the engine bay is installed along with the shock absorber that sits inside the shock tower in the right side.
Step 76: Engine Central Panel, Pump and Brake Fluid Reservoir - Here's another essential item in any car - the master cylinder is mounted to the firewall and the firewall is installed
Step 77: Front Left Panel, Speaker and Suspension - This is a repeat of Step 75 except for the left side of the engine bay, plus the installation of a speaker for the sound effects.
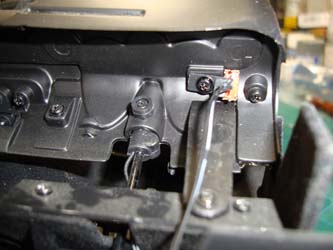
Steps 78-79: Battery, Strut Bar, Oil Filter and Pipes, Washer Fluid Reservoir, Electronic Circuit and Wiring - Most of the items in these two steps are simply adding little details to round out the engine bay. Note the car battery on the lower right and look in the same place in the image above. They use three LR44 batteries to power this beast and they fit inside the shell of the car battery. That's easy enough to remember. The big thing in these steps is the addition of that circuit card over the left wheel that has a number of wires that plug into the card and run out to different areas of the car for control of different lights, horn, etc. You need to take some time here and insure you do proper cable management to prevent wires from appearing from various locations once you assemble the chassis and body shell.
Steps 80-82: Left Front Fender, Chassis Front Panel Right Front Fender - These steps simply assembly the left and right front fenders to the engine bay's front panel and with four screws, the front clip is done and resting on the front of the chassis (for now).
Pack 11
With this pack, we assemble the body shell.
Here's a closer look at Pack Eleven. This pack assembles:
- Main Body Section
- Upper and Lower Side Scoops
- Hood, Front Grille, High-Beam Headlights
- Hood Hinges
- Center Light Bracket, Horns, Hood Pins, Fog Light Lenses, LED System, Wire Holders
- Trunk Lid, Lock and Shelby Emblem
- Lower Rear Body Section, Trunk Hinges and Brackets
- Rear Lights, LED Wires, Gas Cap, Gas Pipe, Cable Holders
Step 83: Main Body Section - The instructions warn you from this point to the finish, do not lay any part of the painted surfaces on your bench/table top without some sort of scratch protection as the paint is easily scratched. I used a microfiber towel which worked perfectly (and I also use them to clean my glasses and magnifying visor as the towels are more effective than anything I've tried and have never harmed my lenses). At the bottom of box 11 is the main body shell and it is heavy. In this step, we add the front fenders built up in Steps 80-82.
Step 84: Upper and Lower Side Scoops - Note that the instructions mis-identify the upper and lower side air scoops, but installation is pretty much fool-proof.
Step 85: Hood, Front Grille, High-Beam Headlights - This is another easy step though you do need to ensure that you've got the photo-etched grille properly oriented before bending the tabs. I used forceps to make the bends square and flush against the grille frame.
Step 86: Hood Hinges - Here is where you need to pay attention to details. The hinges themselves go together without much fuss, but study the instructions to get the orientation of the various parts correct. Also of note is this is the first time (I believe) that you could grab the wrong bag of screws as you have both MD10 and MP10 screws in use with this step. The hinges are quite effective, just like their full-scale counterparts that keep that hood up without help.
Step 87: Center Light Bracket, Horns, Hood Pins, Fog Light Lenses, LED System, Wire Holders - This step has several odds and ends going on and again highlight the mismatch of materials that are used in this kit. The Lynch pins/cables come pre-fabricated and you just need to tie the loose ends off at the designated holes under the hood. The Lynch pins are photo-etched parts that are attached to wire lanyards. On the same brackets that mount the Lynch pins are the holes for the hood pins, and these hood pins are plastic with a slot molded near the top. If you don't get these pins exactly aligned, you'll destroy these pins closing the hood. Be careful here.
In this step, we also install the front LED bulbs/wiring harnesses and this is an easy process. Study the instructions and you'll see the recesses molded into the body shell for routing the harnesses/keeping them out of sight after assembly.
Another interesting feature are the fog lights that mount into recesses below the bumper. I could not get those light lenses into the holes properly to save my life, but then I remembered a tool I had been given but never had a use for - a small handle with a suction cup at the end. I could grab the lens and place it into that recess with no problems. It pays to hang on to tools, even when you don't know exactly what you'll do with them at the time.
Step 88: Trunk Lid, Lock and Shelby Emblem - These steps simply assembly the left and right front fenders to the engine bay's front panel and with four screws, the front clip is done and resting on the front of the chassis (for now).
Step 89: Lower Rear Body Section, Trunk Hinges and Brackets - The hinges on the trunk are robust and easy to install. The truck lid wont stay open like the hood, but it is mounted solidly to the body shell.
Step 90: Rear Lights, LED Wires, Gas Cap, Gas Pipe, Cable Holders - As with the front lights, this step mounts the rear light lenses followed up by the small circuit cards with the rear LED lights. The wiring harnesses are routed through similar slots molded into the body shell as you can see here.
Pack 12
With this pack, we are finishing the engine and engine compartment.
Here's a closer look at Pack Twelve. This pack assembles:
- Windshield
- Windshield Frame and Wipers
- Upper Vent Grille
- Rear Window
- Rear Window Frame and Radio Antenna
- Door Trim and Sill Plates
- Headliner
- Sun Visors and Rear View Mirror
- Rear Valance, Fog Lights and Connecting the Body to the Chassis
- Rear Bumper, Front and Rear License Plates
Steps 91 and 92: Windshield, Windshield Frame and Wipers - The windshield drops into place and the chromed frame overlays the windshield and snaps into place on the body shell. My heart sank as I saw the flaws in the clear plastic that sometimes happens during molding. I initially thought it was some dust or smear that was left when the parts pack was made, but no cleaner or clear plastic polish will touch a flaw like this that inside the plastic itself. This is no bueno quality control folks.
Steps 93-100: The remaining clear parts are all flawless and mount into place as easily as the windshield. The headliner, sun visors, and trim also go into place with no problem. Now for the moment of truth, before mounting the body shell onto the chassis, make sure that the wiring harnesses are all stashed away according to the instructions or else one or more will pop out when the body shell is mounted (ask me how I know). With everything tucked away, the shell goes smoothly into place and I use the designated screws to mount the chassis to the shell. Unfortunately, not all of the mounting holes would align to the chassis, but I have enough screws in use to call this project done.
Completed Model
This has been a long and interesting journey. This is the first model I've built using the monthly subscription approach, and under normal circumstances, this project would have taken a year (some of my other projects exceed that timeline, but I digress). Due to the global pandemic however, this project went a few months longer, but here we are with a completed car. As you can see in the photos below, all of that work brought together a beautiful display model. The completed model is approximately 23 inches long and weighs an impressive (!!!) 17.9 pounds. What would I do differently? There were some opportunities under the hood to apply some washes to make more details stand out, and to use cyano to glue more of the parts that use friction fit to stay together. I would also consider replacing the headlight LEDS as the ones provided are the 'cold white' (bluish white) bulbs which many modern cars use, and replace them with 'warm white' (yellow white) bulbs to replicate the bulbs used in the full-scale cars in that timeframe. I did do a functional check and the lights do work fine, the brake lights also work as does the horn. When I first embarked on this project, I offered to let my wife have the completed model when it was finished (she's a Mustang lover while I an into Jeeps), and I had no sooner finished these photos that the Shelby is now sitting in her office.
If you're looking for an interesting project to undertake, look at this or one of the other 1/8 car kits Agora Models offers. They also offer aircraft and science fiction subjects using the same monthly subscription plan. Have some fun!
My sincere thanks to Agora Models for this review sample!


