Academy 1/35 Tiger I Late Version Build Review
By Stephen Sutton
| Date of Review | April 2017 | Manufacturer | Academy |
|---|---|---|---|
| Subject | Tiger I Late Version | Scale | 1/35 |
| Kit Number | 13314 | Primary Media | Styrene |
| Pros | Nice details and options, ten markings options | Cons | Nothing noted |
| Skill Level | Experienced | MSRP (USD) | $65.00 |
Build Review
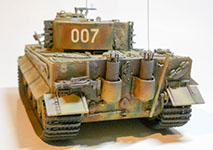
Academy reissued their late-production Tiger I kit and it is a great alternative to some of the other Tiger kits on the market. Before I decided to build this kit I needed to gather all the references to build Michael Wittmann's last ride since the kit provided decals for SS Pz. Abt101 (007) Michael Wittmann near Caen France, August 1944. SS-Hauptsturmfuhrer Michael Wittmann was the most successful and famous tank commander of World War II, an Ace with 138 kills. The kit provides a very nice separate painting and decal placement guide for his 007 command tank (Befehlswagen). Having decided which Tiger tank I was going to build, I preceded to follow the kit instructions for tank version number 2. Only one known photograph for Tiger tactical number 007 was of the wrecked 007, taken by French civilian Serge Varin in 1945, still in the field near Gaumesnil where it had been stopped a year before August 8th, 1944.
Michael Wittmann's "Death Tank," tactical number 007, based on information in Tigers in Combat II, is believed this tank to be a January 1944 production command Befehlswagen tank. This is based primarily on the diary entries that state the unit took delivery of two Befehleswagens on January 3rd, 1944 (there were only three in the unit until it was refit with King Tigers. Further, the organizational diagrams show two rubber-wheeled tanks (007 and 008) from January 1944 right through August. However, careful study of the one existing photo of 007 reveals that this tank is not a January 1944 production, but rather a February production with steel wheels. The third tank of the HQ Company (009) is listed as a steel wheeled Tiger and it is possible that this tank was renumbered as 007 prior to Wittmann's command, but there is no confirmation of this.
Wittmann took over this mount (Tactical 007) from the battalion commander when he was relieved due to severe exhaustion on July 13th, 1944. Wittmann served with it until August 8th, when is group of five tanks was attacked from the flank by the 3rd platoon of A Squadron of the 1st Northamptonshire Yeomanry. Using both 75mm armed Shermans and a single Firefly, they knocked out all five tanks. Wittmann's tank 007 appears to have taken a round into the side armor that penetrated and caused a catastrophic ammunition explosion. More theories surround his death as it was also thought that Wittmann's Tiger was destroyed by a rocket fired from a Royal Air Force Hawker Typhoon" Mk.IB – attack aircraft. You decide for yourself. I also decided to build this kit box stock with no aftermarket added.
Bottom Hull Assembly
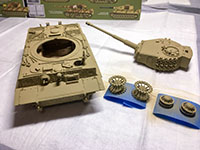
All the road wheel torsion arms where installed along with the front January 1944 cut out style tow hook extensions to accommodate the large C-hooks. The kit only provides the February 1944 steel road wheels and the smaller 600mm idler wheels with the June 1944 Star shaped face sprockets. The road wheels, idler, and sprockets' where all assembled with the kit provided poly bushings. The poly bushings are stiff and I added Chap Stick to them to ease the installation of the wheels to the torsion arms. The Side Mud Guards were one piece assemblies, so I used an X-acto blade to separate the sections and I glued them on after the Zimmerit application. The skirts were treated with minor dents and bends.
Rear Hull and Exhaust Assembly
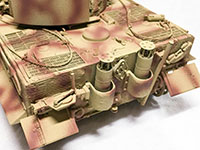
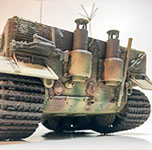
With only a single photograph of tactical 007 available the rear hull and exhaust parts can be assembled as per the kit instructions and the wrecked 007 photo. This is a Befehlswagen tank and was configured differently than the standard unit tanks. The antenna mast tube and C shaped hook is mounted to the right side of the hull and the 15 ton jack was mounted to the right side of the hull. The late production external starter guide plate was mounted high between the exhaust mufflers. The original pattern exhaust stack was used with the flapper and round covers, the sheet metal exhaust guards was not used as they are not found on the photograph, however remember the photo was taken a year later and they could have been salvaged by the farmer along with the missing tank tracks.
Top Hull Assembly
Two top hull assemblies are provided one for the earlier March 1943 style with the two corner headlight mounts, and the other is the June 1944 without the headlight mounts part number Q18 which was used for this build, however this top hull did not provide the correct antenna mounts for the command tank (Befehlswagen) the antenna mount provided is too small for the scale. The April 1943 style Engine deck grates are installed along with the kit provided photo-etch screens. All the tools, hatches and handles were installed next. The drivers hatch was positioned open, however no interior detail came with this kit. The top portion of the hull was glued to the bottom hull, the front upper and lower armor glacis plates were glued in place, the lower glacis plate had a sag in the center so I fashioned a section of sprue inside to remove the sag. The kit provides two different front glacis plates one with the September 1942 water forging MG 34 mount cap and the other was the October 1943 center hull mounted headlight, which I used for this build. Next the tow cables were installed using the provided thread for the cables, the thread is too small and not to scale, but I used them anyways.
Zimmerit Application
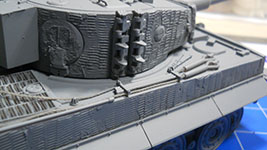
I applied the anti-mine Zimmerit coating to the lower hull, front glacis and rear armor plate as per the kit instructions and also to the turret and 8.8cm KwK 43 L/71 Gun mantlet. The kit provides a very nice photo-etch Zimmerit tool, however my sample did not have this so I used the AFV Club Zimmerit wheel tool. I applied a thin even coat of Bondo Glazing & Spot putty over the affected areas then used my Zimmerit wheel tool, while constantly keeping the tool wet and clean with lacquer thinner. I did try to use Perfect Plastic putty on the gun mantlet but it was harder to keep the water based putty from coming off when using the Zimmerit wheel tool.
Turret Assembly
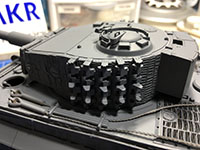
Two turret versions are provided along with three turret roofs. The turret version used for this build was the May 1944 final version with the 40mm thick turret roof and the Tiger II Ausf.B 40mm thick loaders hatch. This turret roof also had the Nahvertridigungswaffe (close-in defense weapon added to the rear area and it had the two welded 40mm plates and not the one 40mm plate bent to shape as found with the March 1944 Tiger 1's. The turret armor sides used was the March 1944 version without the left side small pistol port, and the July 1943 Escape hatch hinge. I attached the spare tracks to the side of the turret as per the instructions, first I glued the tracks to the Zimmerit coated sides then I attached the upper and lower spare track link brackets. The MG 34 anti-aircraft top ring was attached to the late commanders cast cupola and the MG 34 machine gun with kit provided photo-etch sight was attached last after the paint work. The rear stowage bin was installed along with the three lifting bolts for the turret.
8.8cm Gun Mantlet Assembly
Three different gun mantlets and two different gun muzzles are provided with the kit, I used the Later Production Type mantlet with binocular gun sight and I used the later April 1944 smaller lightened muzzle brake. The gun barrel was two piece assembly and not the new style slide molded style found in newer kit toolings, so I filled and sanded some minor seams.
Track Assemblies
The kit tracks are of the rubber band type, first I airbrushed them with 30 percent Tamiya XF-7 Flat Red and 70 percent Tamiya XF-69 NATO Black. The kit instructions have you melt the pins to secure the ends together, this did not hold them together so I stapled then together and used some superglue. The tracks were installed after the tanks was fully painted.
Paint, Decals, and Weathering
I airbrushed the entire model with Badger's Stynylrex Grey primer, then I airbrushed the tank with the base coat of Tamiya XF-60 Dark Yellow, then I applied a camouflage pattern using Tamiya XF-67 NATO Green and Tamiya XF-68 NATO Brown. Then I sealed the paint with Future Floor Finish, this I airbrushed on. Now I applied the kit decals over the glossy finish and I used Tamiya Mark Fit to treat the decals and finished off using Solvaset to get the decals down into the Zimmerit. Next I airbrushed another coat of future. For weathering I applied Tamiya Black enamel panel line accent color and I also applied a pin wash with various oils from the MIG 502 Abteilung range. Then I sealed the washes and oils with Xtracrylix Flat Varnish. Next I painted all the tools and accessories and tow cables. Next I airbrushed a light coat of Tamiya XF-57 Buff over the entire model. I super glued the tank tracks over the sprocket and road wheels. Lastly I added the Antennas using K&S Engineering .020 Brass Rod. The Befehlswagen crow's foot antenna was fashioned with superglue. This kit did not come with the proper antenna mounts for the Befehlswagen version Tiger.
Final Thoughts
Over this is an excellent kit with many options for the various late model Tiger I tanks, short comings with the upper hull sag was easily fixed and the rubber band tracks inability to be glued together with superglue. No rubber type road wheels are provided with this kit and could be used for some version Tiger's. No interior is included with the kit so there was no reason to leave some hatches open. The tow cable thread was too thin and the antenna mounts were not in scale. The kit only figure represents a tanker with an uninteresting pose and head sculpt, I decided not to paint it. This kit screams for aftermarket parts as I was tempted to go that way with it. I highly recommend this kit as it affords great value and has lots of options.
Thanks to MRC for this review sample.
References
- Wittmann's Tiger 007 Photograph by Serge Varin
- The Modeler's Guide to the Tiger Tank by Patrick A Stansell
- Tigers In Combat II by Wolfgang Schneider
- Tiger Ace by Gary L Simpson


