Academy 1/48 I-16 Type 24 Build Review
By Michael Benolkin
| Date of Review | August 2016 Updated April 2019 |
Manufacturer | Academy |
|---|---|---|---|
| Subject | I-16 Type 24 | Scale | 1/48 |
| Kit Number | 12314 | Primary Media | Styrene |
| Pros | Simple build | Cons | See text |
| Skill Level | Basic | MSRP (USD) | $28.00 |
The Project
For a brief history of this subject and a look at this kit out of the box, look here.
I've built a few of these Hobbycraft/Academy kits of the I-16 over the years and they are a simple build straight out of the box. With this recent reissue from Academy, I decided to take a closer look at this kit versus the Eduard equivalent and published my comparison here. Since I had the parts spread out on my bench, spontaneous assembly began with both kits and since both kits have their glitches, I thought it would be fun building them side-by-side. This review will focus on the Academy kit. The objective of this project is not to see how they build out of the box but rather see how much work it takes to bring both kits up to a comparable level.
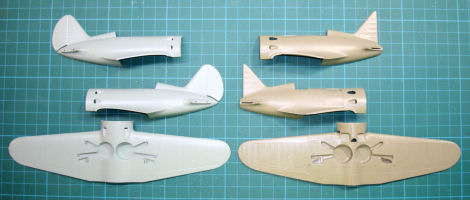
Here's a good look at the two kits side-by-side: the Academy kit (left) versus the Eduard kit (right). Both are Type 24 kits and holding the parts up together show that both kits have very similar shape and cross-section in the fuselage and wings. The differences come down to surface details where the Eduard kit has better representation of the fabric versus metal surfaces of the wings and tail surfaces. As I stated in my comparison, the Eduard cockpit is more detailed but that is due to numerous tiny styrene and photo-etch parts needed to build up the throttle quadrant, landing gear mechanism, flap actuator, etc. Given that the cockpit openings are small since neither have positionable entry doors, much of that detail will be lost except to the special observer equipped with a flashlight.
The wings go together without any problems and I added a scrap styrene tab to the rear of the assembly to help align the underside wing-fuselage joint.
With the wings assembled, I turned to the fuselage and glued the halves together. Since the cockpit can install from under the fuselage, this gives me the opportunity to work on seams and some modifications without harming the cockpit interior. The first thing I wanted to do is remove the molded-on exhaust stubs out of the cowling ducts and replace them with something with better dimension. With the stubs removed, I modified the firewall to extend the cowling exhaust ducts through it. With those mods complete I glued the firewall into place.
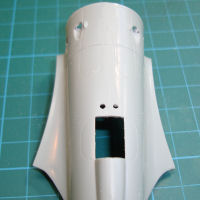
One minor omission in the Academy and Eduard kits are the two 'natural light' holes that are inside the windscreen to allow natural light to illuminate the instrument panel that is mounted deep inside that barrel of a fuselage.
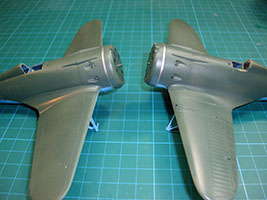
Test-fitting the wing and fuselage assemblies yields mixed results. The underside fits nicely and the seam will only need Mr.Surfacer 500. The upper wing/fuselage seams are a little more work. Since the gaps are nearly uniform, strip styrene will take care of the problem.
The once subtle problem is the starboard leading edge of the wing root. It looks like this was a molding short-shot, but this too can be easily patched with strip styrene.
Here's the styrene filler in place and it is time to move onto the cockpits themselves.
Here are the Academy (left) and Eduard (right) instrument panels, both with Eduard color photo-etched panels installed. Since the Eduard kit came with photo-etched panel and pilot restraints, I obtained a second set of photo-etch for the Academy kit. The gray background of the kit panel is painted black and set aside.
Here's the Academy cockpit 'tub' ready for installation. I've added the heel wells to the floor, replaced the control yoke, and added the Eduard panel and pilot restraints. I thought about adding all of the sidewall details but I suspected that they won't be seen after assembly. The cockpit sidewalls were painted cockpit gray-blue while the floor and seat were painted the standard primer green. I'm using Akan acrylics for both builds to capture the unique colors used in the I-16. When the paint had dried, I used a gray enamel wash on all of the interior surfaces and wiped away the excess. The results bring out the details and dull down the colors to make the cockpit look used.
The fuselage is assembled, cockpit installed, and wings glued into place. Sure enough, with close examination, I can see the pilot restraints, I can't see the instrument panel so any superdetailing inside the cockpit is a waste of time unless you opt to pose the entry doors open.
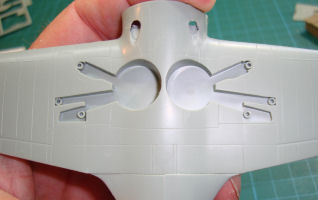
I used the main wheel as a guide to drill the retraction cable channels into the wheel wells.
The horizontal stabilizers are installed and a little filler added.
Here is another interesting difference between the Academy (left) and Eduard (right) kits - the engines. Like the cockpits, the engines are not going to be very visible through the shutter openings on the cowl face. Academy provides a reasonable engine to go inside but aside from the pushrod details, you can't see much difference looking through the front of either model.
The horizontal stabilizers are installed and a little filler added.
The model is on the landing gear and painting begins with the underside blue. This is AKAN's AMT-7 underside blue which doesn't have an equivalent in other paint lines (yet).
With the blue dried, I masked the demarcation lines and painted the upper surface Gunze H302. I was looking for my AKAN AMT-4 Green but discovered I was out, so H302 was the next best choice. Given the weatering that is to come, neither AMT-4 nor AMT-7 will look the same.
When H302 had dried, I masked off the metalic band around the cowling which is a distinctive feature common to the I-16. I used AK Interactive's Extreme Metal Aluminum for this step.
There is that distinctive band around the cowl face. You'll remember that I'm building the Academy and Eduard kits side-by-side.
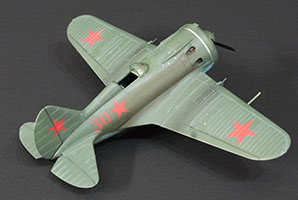
The models are sitting in improvised shelters while their decals set. Both models were treated to a coat of Future for a clear gloss coat before the decals were applied. The Academy kit wears Bort 30. Once the decals had set, both models were given another coat of Future and set back into their shelters to dry.
Here the final steps have been completed: windscreen, guns, pitot boom, wheels, gear doors, and retraction cables all installed.
I decided to try the Tamiya washes to weather the model after receiving a strong recommendaton from a friend. They produce black, brown and gray washes in the same bottles as their glue (and just like my homemade washes). I applied the gray wash on the green surfaces and the brown wash on the blue surfaces. The black wash was used to highlight control surface outlines.
The Tamiya washes are very inconsistent with their content - heavy pigments on one application and almost none on the next few - and that is after aggressive shaking of the bottles. They behave like the AK and MIG washes as excess pigment/wash can be removed with a clean paper towel and any dried pigments can be removed with a clean paint brush or cotton swab dipped in Odorless Mineral Spirits.
Be careful not to work any one area more than a few light strokes or you risk wearing through the Future clear coat. Once I was happy with the initial weathering, I applied a coat of Gunze Flat Clear. After taking a few test-photos of the model (I've been posting in-progress shots on Facebook), I added more weathering until I was happy with the results.
The model is finished and turned out nicely. If I had built this model without the parallel Eduard build, this would have taken little time as the model is an easy build. There are a few quirks in the model that I wish Academy would fix, but there are far more things they did right.
I noted that a few folks feel that the Eduard kit is more accurate. That much is true. While the shape and size of the two kits are spot on, the Eduard kit does a better job of representing the fabric-covered sections of the aircraft. On the other hand, the Academy kit is easier to build. The Eduard kit is over-engineered in a few spots (lots of detail in the cockpit never to be seen again and gear doors that were not fun to hang). You can see in the image above the Eduard photo-etched pilot restraints in the Academy seat, but remember that color-printed instrument panel? You cannot see the panel in either kit. That was a wasted step.
The Academy kit can be built easily out of the box and the AMS modeler might want to add their own enhancements to the model. The Eduard kit is more accurate in terms of surface details on the wings and fuselage, but it suffers from some fit problems, most notably the wing/fuselage joint as well wasted details in the cockpit and the gear doors. The good news is that you have a choice between accurate and ease of assembly.
My sincere thanks to MRC for this review sample!


