Academy 1/48 F-4B Phantom II Build Review
By Fotios Rouch
| Date of Review | November 2013 | Manufacturer | Academy |
|---|---|---|---|
| Subject | F-4B Phantom II VF-111 Sundowners | Scale | 1/48 |
| Kit Number | 12232 | Primary Media | Styrene |
| Pros | First new-tool Phantom in this scale in decades | Cons | Multi-color parts won't please some modelers |
| Skill Level | Basic | MSRP (USD) | $69.00 |
The Project
The Academy F-4B is the first Phantom I built in 48th scale! I have built a myriad of Navy jets including the Phantom I and the Demon relatives but not the Phantom II and this has been a huge gap in my display case collection. I must have at least 10 Hasegawa Phantoms of all flavors in my stash but the first one I will build is the Academy kit.
My guides in this project will be Alexandros from Athens and Gene from Florida both very knowledgeable Phantom guys both great modelers and one great in fixing them and one in flying them.
I decided again to not build it straight out of the box and include all kinds of resin and photo-etch goodies.
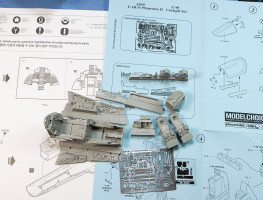
So I started with the cockpit and chose the Aires 4580 set. Looking at what comes in the box leaves you speechless with the level of quality castings and supe rlative detail. After the excitement subsided I started looking at the instructions and the plastic fuselage and trying to figure out how the resin cockpit could be adapted to the kit. First of all, the instructions are entirely useless. No mention whatsoever about where to cut the fuselage around the rear deck or how much to remove between the front and rear cockpits or anything else. The only thing they tell you is that "some" thinning and sanding of the parts might be necessary. I am here to tell you that all the parts, resin and plastic will need to be thinned to where they are almost transparent!
You are on your own in determining how to cut the rear turtle deck to fit the cockpit in place. Aires gives a great representation of the real canopy raising mechanism and it is important to integrate things right. I used Dymo tape to guide me in my guessing game. Aires includes the canopy locks in photo-etch and the fuselage sills where the locks engage in resin and as a part of the side walls. This means that you have to remove plastic from the fuselage but you do not know how much and the instructions skip all that. Test fit a lot and file the plastic away gradually. I had OK results but I still had to use Evergreen styrene to shim the joints between the resin and the fuselage.
The cockpit is full of detail but you have to be careful about what applies to a B or N variant or an early or late B. I especially like the instrument panel dials and the film depiction of the instrument dials. The Mk7 Martin Bakers look really good but it would be very helpful if you have good pictures for painting them and for properly fitting the seat belts. The instructions fall way short again. Man, do I long for the great Cutting Edge instructions from years back!
Once I had the cockpit sorted out I started working on the Aires resin wheel wells. First was the front wheel well. It looks magnificent with all the ribbing, wiring and all the boxes present. Now, trying to fit that under the resin cockpit and sandwich it in the plastic fuselage is a different story. Paper thin surfaces is what you end up with and still things barely fit. After many hours of fiddling with the resin I eventually got a good fit and then secured the top and bottom front fuselage. I chose to insert a properly trimmed and shaped plastic rod at the front of the fuselage joint to ensure perfect roundness and that the front lip was just right and ready to receive the radome later. I believe that if the model was left alone without the resin it would not need any help with any rod inserts.
Same story for the main wheel wells. Troublesome with their thickness but also with their asymmetry. One fits better than the other. Placing them back to back demonstrates their differences. If you sand them enough and shape them they will fit in the end. Another issue that needs attention is that there is no provision in the resin wheel wells to accept the landing gear. I decided to put paint on the top lip of the plastic locating hole and then place the resin wheel well part over it and use the stain as the guide to drill a hole through the resin. Then the plastic was sanded down thin to accept the resin. The speed brake backing plates were inserted next and the bottom of the wing was almost ready for the next stages.
I was not very pleased with the amount of plastic left behind on the top fuselage during the molding process. The tool leaves behind a ridge line starting from the back of the rear cockpit that goes all the way back to the tail. Very careful sanding and scraping is required to remove it without damaging the fine rivets. Also the top fuselage panel insert leaves a gap that needs to be addressed carefully as not to lose the rivet detail.
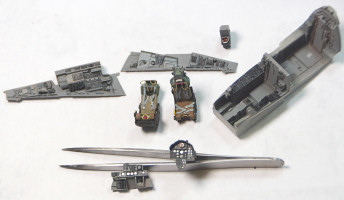
So all was going well until my buddy Alex alerted me to the fact that the early F-4B that I am planning to build did not have MK.7 ejection seats but Mk.5 instead. So, my Mk.7s were saved in a box and the search for Mk.5s started.
Enter Hypersonic Models from the UK. They offer very nice Mk5s for Navy and Air Force. I like that the two seats in the package are not identical to each other but have the molded seat belts positioned differently. I am not sure if any other resin aftermarket companies do that. Here they are painted up although I need to learn how to shade things better.
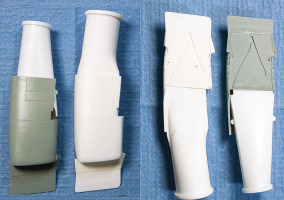
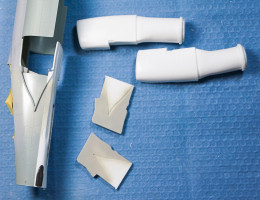
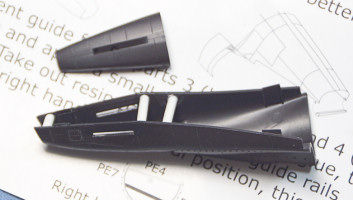
So after all that is done I feel that the pace can pick up with buttoning up the model. The next big item to tackle was the DMold intakes. As much as I be applaud Academy for offering intake trunks, the DMold full length intakes are a great improvement. They offer proper intake trunk width and depth, they offer significantly more detailed and accurate intake fans but also they offer the missing detail on the top and bottom rears of the splitter plates.
The Phantom bible and best reference for modelers has very clear pictures of all that. I thought it was long sold out but it is still available here. The book above has also great pictures of the four supports between the splitter plates and the fuselage. They are missing from the Academy kit as well as the Venturi air flow indicator inside the port intake.
I decided to paint the area between the splitter plates and the fuselage since it would be difficult to get the airbrush stream in there after attaching the intakes and splitter plates to the fuselage.
The DMold intakes went on without much fuss at all. Having them molded in white also helps with painting. Very little putty was required at the joint points between the intakes and the fuselage. Minor sanding and then a coat of Mr Surfacer followed. Light scribing brought back the panel depth.
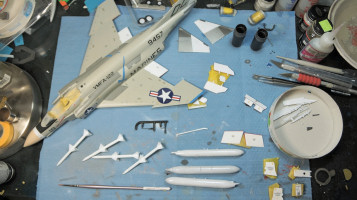
The next job was to build the pylons for the SUU-16/23 gunpods. I cut off the pylons from the wing tanks, added more height to them from styrene stock, filled the rear top part of the pylon and then cut off a small notch in the rear and then sanded them and primed them. The only thing left is to create the areas for the gunpod attachment points. The central pylon was harvested out of the Wolfpack resin set.
The rear fuselage area over the exhausts needed more work than I thought. The top and bottom parts did not match in width. The Hypersonic Models set alerts you to that in the instructions for the replacement photo-etch elevator attachment plates. Another must have set by the way.
Next, the wings went on, also without much trouble.
The Hypersonic Models resin elevator wings will be cleaned up next and get ready for painting but will not be attached until the end.
The bottom joint between the fuselage and the bottom of the wing needs attention and I think it is the weakest point with the kit construction-wise. I took my time adjusting the joint but as you can see it needs putty and Mr Surfacer. Careful sanding followed as to minimally affect the surface detail. After priming I still had to go back and touch up the scribed panel lines.
Next I sprayed Modelmaster gloss white on all the under-wing parts and the wings. White is a tough color and it needs attention. Just the same, after the paint totally dried up I hand polished it with Micro-mesh polishing cloths.
I focused next on the photoetch details that go under the clear parts.
The canopy locks look good and go on OK. Before I pose the canopies open I will bent the locking hooks so they are perpendicular to the canopies but not just yet. The rear canopy bulkhead photoetch part does not look like the depiction in the instructions and it does not fit under the plastic at all. I had to clamp down the tinny part and Dremel it into a shape that would fit under the canopy.
Next, I painted the wheels and the interior black over the canopies and the canopy area.
Following that I masked the nose area off since it is going to be white and radome tan in the end. I masked and stuffed the intakes with wet tissue paper and then painted the top surface with Testors gloss light gull gray. The paint needs to sit for a whole day in a sunny room until it also receives hand polishing attention with Micro-mesh polishing cloths. Next I am going to spray the fin tip and the lower canopies with Xtracolor 15183 Bright Blue as per the Furball instructions which appears to be matching the VMFA-122 blue sword rather well.
So the quest continues with masking for insignia red. I choose airbrushing when I can for red since it is also a touchy color to get right with a brush. So the speed brake parts, the aux air vents and the speed brake wells were masked and sprayed with Modelmaster insignia red. The landing gear door edges were hand painted.
One area you might want to tend to is the gap left after joining the top and bottom wing parts at the flap/aileron joint. Just cut an appropriate strip of styrene sheet and fill the area. In most pictures the inside of the flaps is also painted red.
Next job was to do the elevators in various metallic shades. Alclad II looks nice but for this application heavy weathering and ware will be required. The AN/APR-30 radar homing and warning system was painted next in black which will make an interesting visual between the white, radome tan and gray combination.
After some small touch ups and after noticing that it would be impossible to mask the refueling bay after the decals would be on, I masked and sprayed white the interior of the bay.
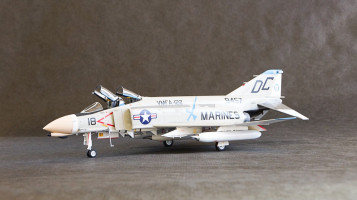
I chose the Furball decals which includes my favorite Marine Phantom. The decals are of excellent quality, they were elastic, they snuggled down onto the plastic really well and reacted beautifully to the decal set solutions.
The gunpods went on with small alterations. I used the Hasegawa weapon set ones as well as one from the kit. I absolutely love the Lou Drendel images of which can be seen here.
To recap on this effort:
- The Hypersonic A/C intakes, MB Mk.H5 ejection seats and unslotted stabilators are all must haves. One mistake I made was to remove the alignment tabs on my set which was not necessary. All sets very much recommended.
- The DMold intakes are also a must. The kit intake trunks are short and not of the correct shape, although it is nice that Academy made an effort. Much recommended.
- The Aires aux underbelly intakes are nice and they fit well. Recommended but not visible without a mirror under the model.
- The Aires wheel wells are so-so. Not mirror images of one another, not made to accept the landing gear without major mods and interfere big time with the resin cockpit. Very nice to look at though if you manage to get them to work. The Aires cockpit is a work of art but it does not fit well at all. If you are planning to use the Aires wheel well set then be prepared for major sanding down to paper thin surfaces. The instructions are worthless and do not even mention about the rear deck surgery required to incorporate the cockpit set and the hydraulic ram for the rear cockpit. The ejection seats are suitable for late Phantoms. I recommend it to those willing to risk ruining their model. End results are pleasing.
- The KA models exhausts and wheels are nice.
My Academy copy of the F-4B had the following issues:
- The nose cone contours did not match the fuselage
- The rear fuselage parts needed spreaders to match each other without leaving behind a major step
If I were to build another Academy Phantom, I would only add the Hypersonic parts and the DMold intakes.
I am glad I now have my first F-4 in my collection right next to my resin FH-1 Phantom I!


