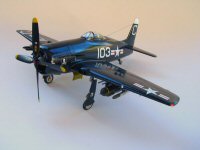
Academy 1/48 F8F-1 Bearcat Build Review
By Stephen Sutton
| Date of Review | March 2006 | Manufacturer | Academy |
|---|---|---|---|
| Subject | F8F-1 Bearcat | Scale | 1/48 |
| Kit Number | 12201 | Primary Media | Styrene |
| Pros | Great Fit/Easy Build | Cons | Cockpit details - Decals |
| Skill Level | Basic | MSRP (USD) | $25.00 |
Background
If you'd like to take a look at the kit as it comes out of the box, check out the in-box review
previously published here on Cybermodeler.
Construction
The kit went together very nicely only a few minor problems occurred during the build.
First I assembled the cockpit, everything was first painted interior green FS34151 Model Master Acryl was used, then I painted the side instrument panel and main instrument panel matt black and then I picked out all the details with a toothpick using red yellow and silver. The cockpit was set aside. No seatbelt detail is provided for the seats. Next I assembled the engine then I painted the engine gray, steel and gloss black push rod tubes, then the harness was painted leather brown. Note that the engine represented in this kit is not accurate and an aftermarket engine would be a better choice.
Next the fuselage halves where washed and the cockpit area was painted interior green and the tail wheel bay was painted yellow green Tamiya acrylic XF-4. The sight for the bombsight did not have a clear window, so I fabricated a clear window out of some clear acetate in my spares box. Next I installed the cockpit assembly and main instrument panel to the right halve of the fuselage, then I glued the fuselage halves together, and I put the fuselage aside to dry. After this I discovered the main instrument panel wasn’t centered to the instrument combing, but everything was already dry, so I would recommend dry fitting the instrument panel and mark the location with a fine marker for proper location before cementing. Since the detail of the cockpit was so sparse I decided I was going to leave the canopy closed so my error with the instrument panel won’t be seen anyways. No filler was required for the fuselage halves.
Wing construction was next; this is where you will need to decide what version Bearcat you will be building, either the French Air Force or Blue Angle F8F-1B version or the two US Navy F8F-2 versions. I decided I was going to build the –2 version with the taller tail and external stores. The wings where drilled for the external bomb and rocket mounts, then the wheel wells where painted yellow green. The wing halves went together with no problems, however I didn’t notice some minor sink marks on the trailing inboard edge of the flaps until I finished painting the wings. The wings and horizontal stabs where installed in the fuselage with no problems. Next the engine assembly was installed and the shorter engine cowl was chosen for the –2 Bearcat. The exhaust pipes where drilled out with a pin vise and set aside for installation later. The gun barrels where also drilled out with a pin vise.
The landing gear was cleaned up and painted next, Academy has already provided some nice weighted tires for the kit, so I only had to sand the tiny flat spot on the tail wheel. The landing gear will be installed later after the paint job. Everything assembled beautifully with the landing gear later on.
Painting and Finishing
Before I painted everything, I took some extra time to scribe the areas of the wings for the wing folds, then I installed and windscreen and canopy and I masked everything off for painting. Tamiya tape and wetted tissue was used. I airbrushed the bearcat panels with matt black, but this proved to be a waist of time since the main color will completely cover the panel highlights. Model Master Acryl gloss navy blue FS15042 was airbrushed next. The tail tip was painted gloss white. Next the decals for VF-61 Jolly Rogers, USS Franklin D. Roosevelt (CVB-42), 1942 was applied next. These decals are in good register but very thick, they did not conform to panel lines at all, and did not react to any decal setting solutions.
Know I installed all the landing gear components and gear doors. I removed all the masking and I cleaned out the navigation light lenses and I painted the navigation lights with Tamiya clear red and green. Formation lights and landing lights where installed next with Model Master canopy glue. The long wire antenna from the tail to the fuselage did not have any mounts so I fabricated these from the tip of a toothpick and a small piece of plastic. Next I airbrushed everything with a coat of Future floor wax to seal up the decals and improve the overall gloss finish of the navy blue. I assembled painted the bombs and rockets then I glued these to the pylons. The gun barrels, propeller and antenna were installed last.
Conclusion
Overall this is an easy build with very little filler required; attention to installation of the main instrument panel is required. The cockpit is sparse with no seatbelt detail and the decals did not conform or react to decal setting solutions. I’m please with the over look of this bearcat kit, and with the availability of aftermarket details available the AMS builder could really turn this kit into a show winner.
Many thanks goes out to MRC for this review sample.


